My adventure with Naan and Lebneh - the kids love it
I recently received a recipe for Lebneh, which is a traditional middle eastern cheese made from yogurt and herbs, from someone reading about my yogurt making adventures. & nbsp; It is a great way to use up my milk and make something yummy to eat.
It is a very easy and absolutely delicious way of making a yogurt cheese and is & nbsp;a delicious & nbsp;spread to put on crackers. & nbsp; Everyone who tried it loved it! & nbsp; This would be so great for a nice summer lunch with iced tea and some cold roast chicken and a salad.
After I made the Lebneh (recipe to follow) I bought some Naan, which is an Indian flat bread, at Walmart. & nbsp; It was yummy but at 2.50 for a package of two a bit to pricey for me to make a regular purchase. & nbsp; The kids begged me for a taste and loved the Naan so much I decided to find the recipe online and make it at home. & nbsp;

Well here is to success because not only was it really simple to make, but it also turned out great. & nbsp; I smeared it with the Lebneh and the kids liked it just plain. & nbsp; Although Submarine Captain wanted to put peanut butter on it. & nbsp; They all asked for thirds and it was gone in one afternoon. & nbsp; Husband really enjoyed it and made some broad hints that I should make it daily. & nbsp; LOL!
In the following recipe link they said to use a grill, but I wasn't about to go and make a fire in my grill just for that, so I used my cast iron pans over my gas stove and it worked just fine.
http://allrecipes.com//Recipe/naan/Detail.aspx
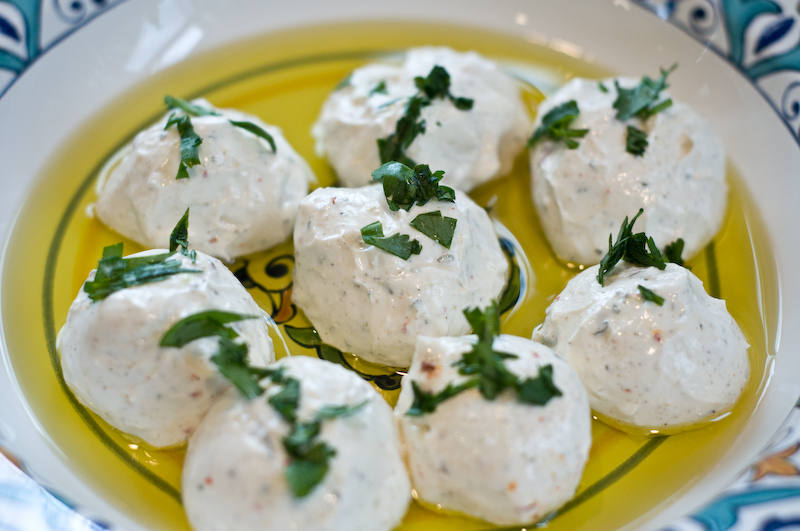
Lebneh Cheese
3 1/2 pints of yogurt
2 1/2 fl oz virgin olive oil
grated rind and juice of 1 lemon
3 tbsp dried mint (optional)
1 tbsp finely chopped thyme (optional)
Place all the ingredients in a large glass bowl and beat thoroughly with a wooden spoon until all are thoroughly combined.
Line a large bowl with a double layer of sterilized muslin, leaving plenty of material overlapping the sides, and pour in the yogurt mixture.
Tie the ends of the muslin together and secure it tightly, then hang it over the bowl.
Leave it to drain in a cool place, such as a larder or unheated room, between 42-46 degrees, for 2 or 3 days. (On hot days, put it on the bottom shelf of your fridge.)
Chill the well-drained mixture until it is firm to the touch - this makes it easier to handle. Shape desert spoon sized amounts into 1 1/2" balls.
Chill the balls if necessary, so that they keep their shape, then arrange them in a sterilized jar.
Pour virgin olive oil into the jar, making sure that all the & nbsp;cheese is covered, rap the jar several times to ensure that there are no air bubbles present, and then seal.
The cheese & nbsp;is ready to eat immediately, but will improve with age, and it can be kept up to six months. It's good as an appetiser, spread on on pita bread
Chloris recipe tweaking
I used chives and garlic in place of the herbs specified and it was great. & nbsp; I also used Herbs De Provence and that was amazing too. You could make tons of combinations here to suit your tastes. & nbsp; Also I didn't bother with the cheesecloth thing, I just put it into a paper towel lined colander over a bowl in the fridge and then covered the top with saran wrap to keep it from drying out on top. & nbsp; Worked just fine!
Label: Home
diposting oleh Alfanez @ 13.49
0 Komentar
![]()

0 Komentar:
Posting Komentar
Berlangganan Posting Komentar [Atom]
<< Beranda